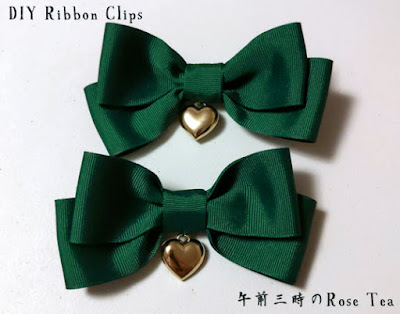
DIY: Pair of Ribbon Bow Clips
I have made a few different hair ribbons in this style now and wanted to share a tutorial. These are great to decorate buns, ponytails, or braids, or as part of a larger arrangement of accessories in your hair.
You will need some basic hand sewing skill to make these, though some of the sewing steps can be done by machine. These are made out of ribbon; I may make another one at a later time for fabric ones.
Difficulty: Easy
Time: About 1 hour
Finished size: Each one is approximately 4.5 in (11.5 cm) wide by 2.25 in (5.7 cm) tall.
If your ribbon is made of synthetic fiber (polyester, rayon): light the candle and singe the raw edges of all the pieces of ribbon to stop them from fraying. My method to help the fibers melt evenly and not burn is as follows: Slowly hold a corner of the ribbon edge closer and closer toward the base of the flame from the side until you find the point where it's hot enough to see the fibers start to melt and bead. Once you see this happening, move the edge of the ribbon along that spot until the edge is melted and sealed. Even if the edges do discolor, it's not a big deal because you will not see them on the finished product.
Gently fold one of the 10 inch pieces of ribbon in half with right sides (the surface you want to show on the finished product) touching each other. Using a running/straight stitch, sew 1/8 inch from the edge to create a loop. Turn inside out. Repeat with other 10 inch piece and both of the 9 inch pieces. The pieces for 1 bow are shown above (to show the sewing in the picture, they are not yet turned inside out).
Take one of the smaller loops and lay it onto the larger one with about half of it overlapping as shown in the photo. Make sure that the middle seams are lined up together (they are on the back side in the photo). Sew a loose running stitch along the middle of the two pieces to attach them to one another but do not tie off the thread, using a sewing pin to keep the pieces in place if needed. I usually make about 6-7 stitches and start with the knot on the back side so that the edge of the bow will curl under. Pull on it gently to gather the ribbon pieces and form the center of the bow. Tie off the thread to keep the bow gathered, but do not cut off the excess thread.
Center the toothed part of the clip only on the middle of the bow on the back side (see photo). The side with the handle will be slightly longer.
Bring up the thread from the middle tie of the bow next to the space between the first and second teeth. With the clip open, lay the thread in the low part between the teeth. Insert the needle into the ribbon, poking it underneath the clip and coming back out of the ribbon on the other side of the clip, in between the next two teeth. Pull through and tighten the stitch, making sure the thread from your stitch stays in place between the clip's teeth on both sides. Repeat this until you have stitches between 5-6 teeth. Tie off the thread and cut the excess thread off.
Repeat with the other clip and bow. Make sure to have the clip pointing in the opposite direction if you plan to wear them on either side of your head -- this can make them easier for you to put them on.
You could also glue the clips to the back, though I think this method is less secure than sewing.
Here are some variations on this clip I've seen from brands.
You will need some basic hand sewing skill to make these, though some of the sewing steps can be done by machine. These are made out of ribbon; I may make another one at a later time for fabric ones.
Difficulty: Easy
Time: About 1 hour
Finished size: Each one is approximately 4.5 in (11.5 cm) wide by 2.25 in (5.7 cm) tall.
MATERIALS
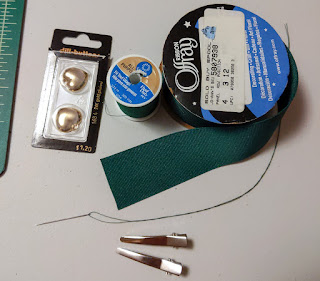
- 44 inches (112 cm) 1.5 inch/38 mm wide petersham or grosgrain ribbon
- A small candle and match or lighter (optional but highly recommended if ribbon is made of synthetic fiber)
- 1 spool of thread in same color as the ribbon
- Hand sewing needle
- 2 small alligator clips (you could also use combs)
- Decoration for the middle (optional). The gold heart charms on the bows pictured above are made by Dill Buttons. You could also use beads, buttons, or sew-on rhinestones.
INSTRUCTIONS
Step 1: Cut ribbon
Cut 6 pieces of ribbon:- 2 pieces that are 10 in (25.4 cm) long -- this will be the bottom part of the bows
- 2 pieces that are 9 in (23 cm) long -- this will be the top part of the bows
- 2 pieces that are 3 in (7.6 cm) long -- this will be the part that wraps around the middle of the bows
Step 2: Seal raw edges of the ribbon
If your ribbon is made out of natural material (cotton, silk, etc): skip this step or use a fray sealant.If your ribbon is made of synthetic fiber (polyester, rayon): light the candle and singe the raw edges of all the pieces of ribbon to stop them from fraying. My method to help the fibers melt evenly and not burn is as follows: Slowly hold a corner of the ribbon edge closer and closer toward the base of the flame from the side until you find the point where it's hot enough to see the fibers start to melt and bead. Once you see this happening, move the edge of the ribbon along that spot until the edge is melted and sealed. Even if the edges do discolor, it's not a big deal because you will not see them on the finished product.
Step 3: Make loops for the bow top and bottom
 |
| pieces for one ribbon bow |
Step 4: Form the bow shape
 |
| gathering stitches before pulling |
Step 5: Cover the middle of the bow
Fold one of the 3 inch pieces of ribbon in half lengthwise. Wrap it around the center of the gathered bow pieces, making sure the ends are on the back side. Fold the edges of the middle ribbon piece under. You may need to pull or arrange the bow pieces to make them lie nicely. Whip stitch the edges of the small ribbon piece together.Step 6: Attach the clips
Center the toothed part of the clip only on the middle of the bow on the back side (see photo). The side with the handle will be slightly longer.
Bring up the thread from the middle tie of the bow next to the space between the first and second teeth. With the clip open, lay the thread in the low part between the teeth. Insert the needle into the ribbon, poking it underneath the clip and coming back out of the ribbon on the other side of the clip, in between the next two teeth. Pull through and tighten the stitch, making sure the thread from your stitch stays in place between the clip's teeth on both sides. Repeat this until you have stitches between 5-6 teeth. Tie off the thread and cut the excess thread off.
Repeat with the other clip and bow. Make sure to have the clip pointing in the opposite direction if you plan to wear them on either side of your head -- this can make them easier for you to put them on.
You could also glue the clips to the back, though I think this method is less secure than sewing.
Step 7: Attach decoration
Hand sew a charm to the bottom edge of the middle of each bow, making sure to hide thread knots inside the bow middle or on the back side.VARIATIONS
 |
| Top row, from left to right: Metamorphose, Angelic Pretty, Alice and the Pirates Bottom row, from left to right: Angelic Pretty, Baby the Stars Shine Bright, Angelic Pretty |
Here are some variations on this clip I've seen from brands.
- Use two different shaped charms that are the same color and material
- Use a different color or type of ribbon for the top and/or middle part of the bow
- Sew lace or another trim to some or all of the edges of the 10 inch and 9 inch pieces (after Step 2)
- Sew lace or ribbon along the middle of the 9 inch (top) and/or 10 inch (bottom) pieces (after Step 2)
- Sew an embellishment (button, rhinestone, flower, etc.) to the middle front of each bow (after Step 6)
- Sew beads to the top half of the bow (after Step 6)


